Samsung, like the other Android phone producers, provides screenshot and screen recording options on their phones and tablets, though screen recording is restricted to some Samsung models. However, Samsung does more than that and provides some customization options for the Samsung users to change some settings for screenshots like format, show toolbar after capturing, and for screen recording like sound, video quality, and so on. Even though they are not that advanced that can satisfy an advanced Samsung user, they surely can satisfy a basic Samsung user.
In this post, all six options for screenshots and all five options for screen recording for Samsung phones and tablets will be examined. We will provide some basic information and how to enable and disable the relevant options on your Samsung device. Without further ado, it is good to dive right into the topic of useful settings for screenshot and screen recorder on Samsung phones and tablets.
Useful Settings for Screenshots on Samsung
1 | Show Toolbar after Capturing
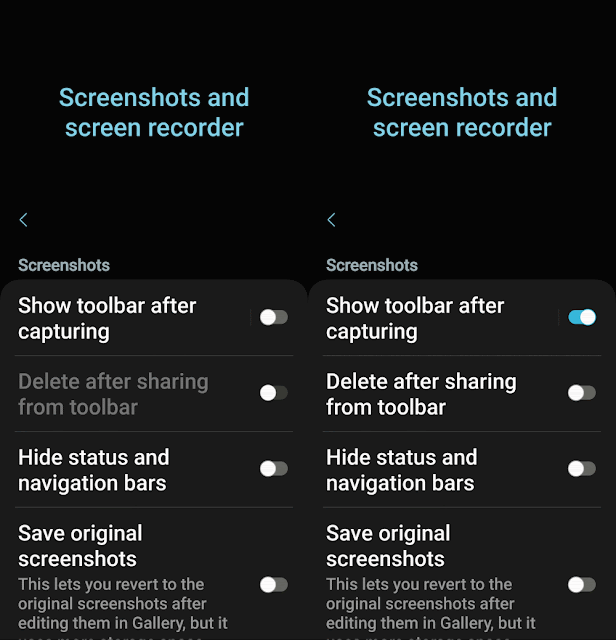
If you do not want to see the toolbar which refers to the small window consisting of options and tools appearing at the bottom of the Samsung device, you can disable the "Show Toolbar After Capturing" feature from Screenshots and Screen Recording Settings.
In order to disable "Show Toolbar After Capturing":
- Go to Settings.
- Find and tap on Advanced Features or search for Screenshots and Screen Recording in Search Box and tap on the relevant search result.
- Ultimately, disable "Show Toolbar After Capturing" by switching off the toggle button next to it.
In this way, you will see only the screenshot flash that informs you about the fact that the screenshot has been successfully taken and the toolbar will not appear at the bottom of the screen of your Samsung device.
In case you want to see the toolbar after you take a screenshot on your Samsung phone or tablet, you can follow the steps above to enable it again. The only difference is that at the very last step just switch on the toggle button next to it.
2 | Delete after Sharing from Toolbar
Provided that you do have not much storage to store any single photo or screenshot on your Samsung device or you do not want to fill your internal storage with a bunch of junk screenshots, there is a way that saves you from manual action, that is to say deleting all the screenshots one-by-one with hand. This feature automatically deletes the screenshot from the gallery and does not store it in the relevant area on your Samsung without any distinction after you share it from the toolbar.
In order to enable "Delete After Sharing From Toolbar":
- Go to Settings.
- Find and tap on Advanced Features or search for Screenshots and Screen Recording in Search Box and tap on the relevant search result.
- Ultimately, enable "Delete After Sharing From Toolbar" by switching on the toggle button next to it.
- After that, take a screenshot, tap on the "Share" option from the toolbar, and share it on any place like a social media account.
With this, you can share screenshots with a friend or anyone else and get rid of hundreds of screenshots stored in your Gallery that are waiting to be deleted.
In case you want to disable the feature, you can follow the steps above again. The only step you should do otherwise is the last one which is to say disable "Delete after Sharing from Toolbar" by switching off the button next to it.
3 | Hide Status and Navigation Bars
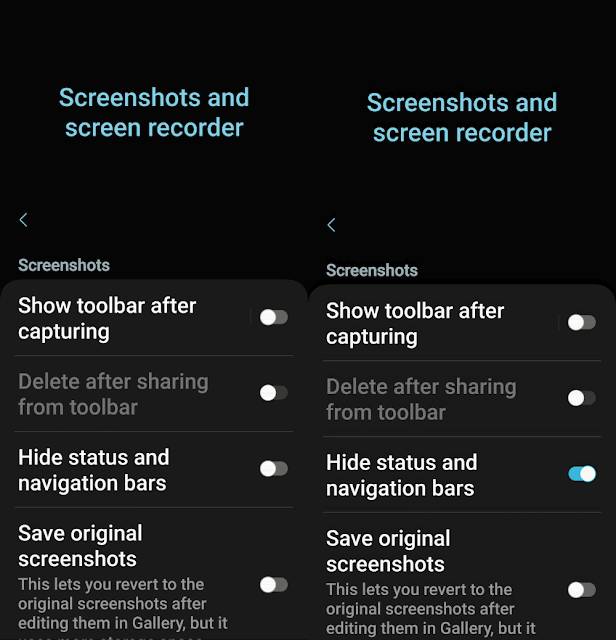
To reach the best results on a screenshot, sometimes it is required to omit the status and navigation bar. Just for that reason, Samsung offers a feature to hide status and navigation bars on screenshots. Consequently, you should not edit the screenshots to delete the status and navigation bar parts. Just with one switch, Samsung does the work for you.
To enable "Hide Status and Navigation Bars":
- Go to Settings.
- Find and tap on Advanced Features or search for Screenshots and Screen Recording in Search Box and tap on the relevant search result.
- Ultimately, enable "Hide Status and Navigation Bars" by switching on the toggle button next to it.
To disable "Hide Status and Navigation Bars", follow the steps above but just switch off the button next to "Hide Status and Navigations Bars" instead of switching it on, as expected.
4 | Save Original Screenshots
You might not like the edited screenshot and you may think you should take screenshots again but there is no need for that because Samsung provides a feature that allows you to save original screenshots as well as the edited ones in your Gallery. This feature allows you to revert to the original screenshots after editing them in your Gallery, but it might use more storage space.
In order to use "Save Original Screenshots":
- Go to Settings.
- Find and tap on Advanced Features or search for Screenshots and Screen Recording in Search Box and tap on the relevant search result.
- Ultimately, enable "Save Original Screenshots" by switching on the toggle button next to it.
When you edit a screenshot in Gallery and do not like it very much, you can easily revert it to the original screenshot with that feature. But how to use it? Here it is:
- Open Gallery on your Samsung phone or tablet.
- Select the edited screenshot and enlarge it to see the "Edit" option.
- Find the "Edit" option which has the symbol of "Pencil" and tap on it.
- From the very top of the current screen, tap on "Revert".
- Read the notification and tap on "Revert to Original" to revert the edited screenshot to the original one.
- In this way, all the edits on the screenshot will be cleared. Finally, tap on "Save" from the very top of the current screen again next to "Revert" to save the settings.
5 | Screenshot Format
Without any need for any third-party application to convert the screenshot format from one to another, Samsung provides you to select the screenshot format, however, it is restricted to just two: JPG and PNG. For any other format, unfortunately, you should download a third-party application or anything else to convert it from JPG or PNG to the format you want to convert to. However, those who want to change the default screenshot format either to JPG or PNG can easily follow the steps below:
- Go to Settings.
- Find and tap on Advanced Features or search for Screenshots and Screen Recording in Search Box and tap on the relevant search result.
- Find the "Format" heading and tap on it.
- On the menu, choose the default format which can either be JPG or PNG.
From now on, you can change the screenshot format by following the steps above with ease.
6 | Save Screenshots in
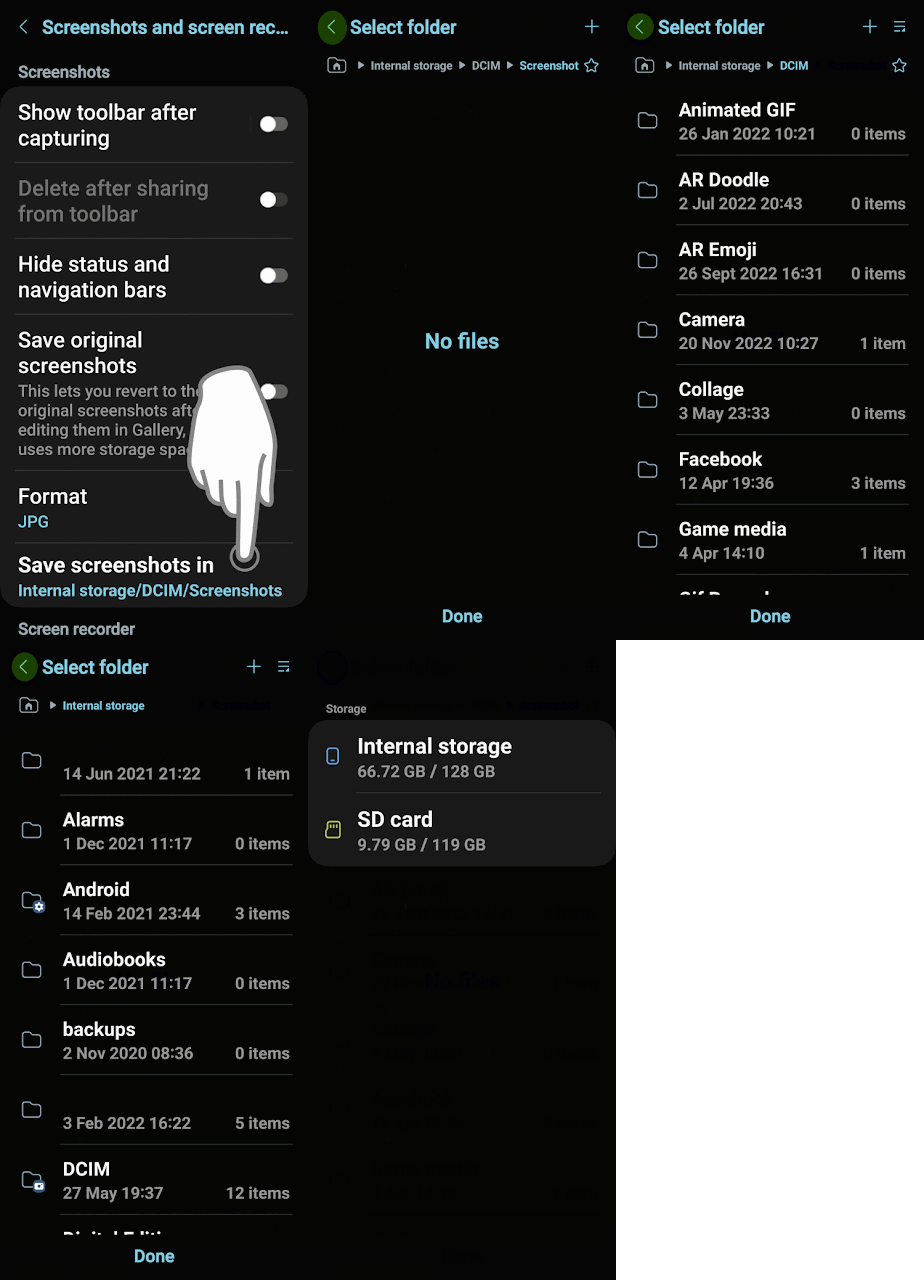
This feature is exactly for the ones who do not have enough free space for screenshots on their Samsung phone or tablet because it allows Samsung users to change the directory to save the screenshots in provided that they have SD Card on their Samsung devices. Apart from that, you can additionally change the directory within the Internal Storage without any concern about storage.
In order to change the directory to save the screenshots, you should select the directory by following the steps as follows:
- Go to Settings.
- Find and tap on Advanced Features or search for Screenshots and Screen Recording in Search Box and tap on the relevant search result.
- Find and tap on "Save Screenshots in" under the relevant heading you can see where your screenshots are saved on your Samsung phone or tablet.
- On the "Select Folder" page, tap on "Back <" until you see both Internal Storage and SD Card options. You may choose another directory in Internal Storage again but also select any directory on SD Card as well.
- Just select the folder that you want to screenshots in and tap on "Done" from below to save the settings.
Thus, all of your screenshots will be saved in the folder that you have just selected. They can be accessed from Gallery again but they will be saved in a different folder either in Internal Storage or SD Card.
Useful Settings for Screen Recorder on Samsung
1 | Sound Settings
Even though Samsung lets you choose what sound will be recorded in the screen recording, you can set a default sound option as well. Thus, each time before you start screen recording the default sound will be shown as the one you set from the Settings.
As with any other options for the screenshot, the place you should find to set the default sound option for screen recording is the same:
- Go to Settings.
- Find and tap on Advanced Features or search for Screenshots and Screen Recording in Search Box and tap on the relevant search result.
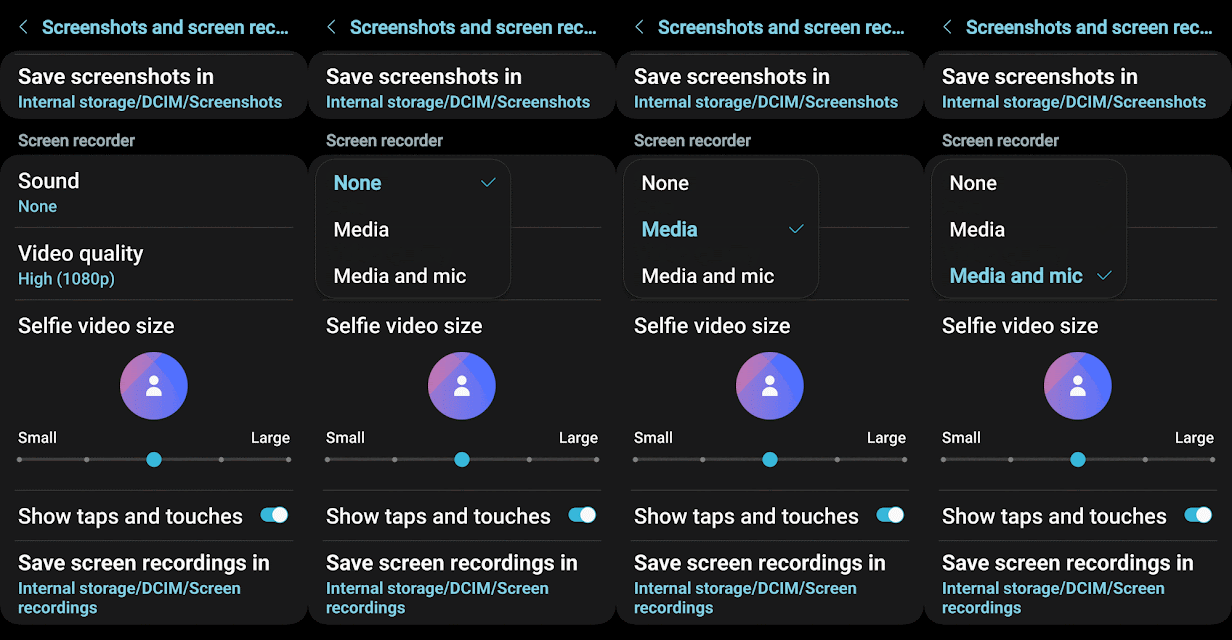
- Find Screen Recorder main heading and Sound subheading and tap on the relevant place.
- Select the default sound option. You have three options: none (do not record any sound for the screen recording just the plain view of the screen record), media (only records the sound inside the Samsung phone or tablet), media and mic (records the sound both inside and outside the Samsung phone or tablet).
In this way, you will see the default sound option you set on the screen that is shown before starting the screen recording on your Samsung device. In order to set a different sound option, you can follow the steps above again.
2 | Video Quality Settings
If you do not have enough storage to store high or medium-quality screen recordings on your Samsung phone or tablet, then you can easily lower the video quality for the screen recording. In another case, you may have enough storage to store high or medium-quality screen recordings, in that case, you can increase the video quality with the help of the Video Quality setting for Screen Recorder. However, the options are restricted to just three different video quality.
Selecting the video quality is as easy as the other options, just follow each step below one by one:
- Go to Settings.
- Find and tap on Advanced Features or search for Screenshots and Screen Recording in Search Box and tap on the relevant search result.
- Find Video Quality and tap on it.
- Select the video quality in which you have three different options: High (1080p), Medium (720p), and Low (480p).
For any other upper or lower video qualities, you should install third-party applications for screen record on Samsung devices. Until now, it is just restricted to these three different video qualities.
3 | Selfie Video Size
You might not be heard before but you can add your face to the screen recording by tapping on the "Person" symbol from the toolbar that appears when you start the screen recording. However, the selfie video size might not be big enough for your needs as the default one. Do not worry, you can either make it small or large with the help of options in Screenshots and Screen Recording Settings.
- Go to Settings.
- Find and tap on Advanced Features or search for Screenshots and Screen Recording in Search Box and tap on the relevant search result.
- Find Selfie Video Size heading and set your selfie video size with the help of the bar. Just tap on the dot close to the Small to make it smaller and tap on the dot close to the Large to make it larger.
4 | Show Taps and Touches
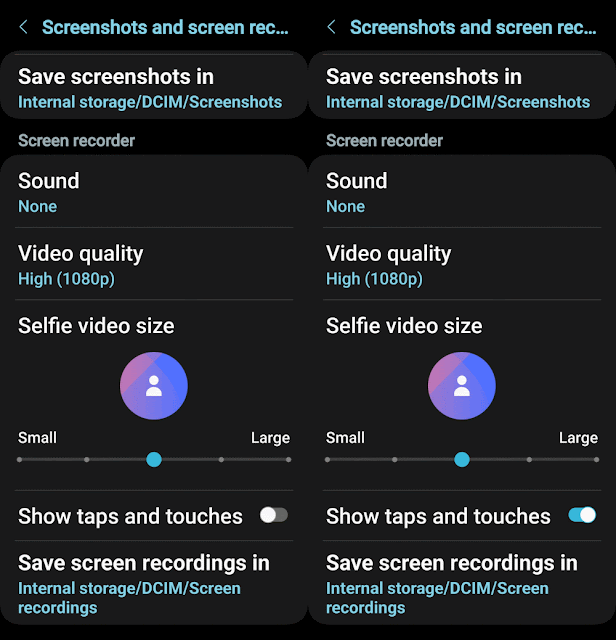
Before starting the screen recording, Samsung enables the Show Taps and Touches options as default. It is a feature that demonstrates each area that is tapped or touched on the screen recording with a grey-colored circle. And you may not want to show any taps or touches on the screen recording. Even though it can be disabled on the prior settings page before starting the screen recording, it can be also either enable or disabled as default from the Settings.
In order to disable or enable Show Taps and Tocuhes options, follow the steps below:
- Go to Settings.
- Find and tap on Advanced Features or search for Screenshots and Screen Recording in Search Box and tap on the relevant search result.
- Find Show Taps and Touches and enable them by switching on the button next to it or disabling it by switching off the button next to it.
5 | Save Screen Recordings in
Because it allows Samsung users to change the directory to save screen recordings in, assuming they have an SD card on their Samsung devices, this function is only for those who do not have enough free space on their Samsung phone or tablet for the screen recording.
You should choose the directory by doing the action listed below in order to modify the directory where the screen recording will be saved:
- Go to Settings.
- Find and tap on Advanced Features or search for Screenshots and Screen Recording in Search Box and tap on the relevant search result.
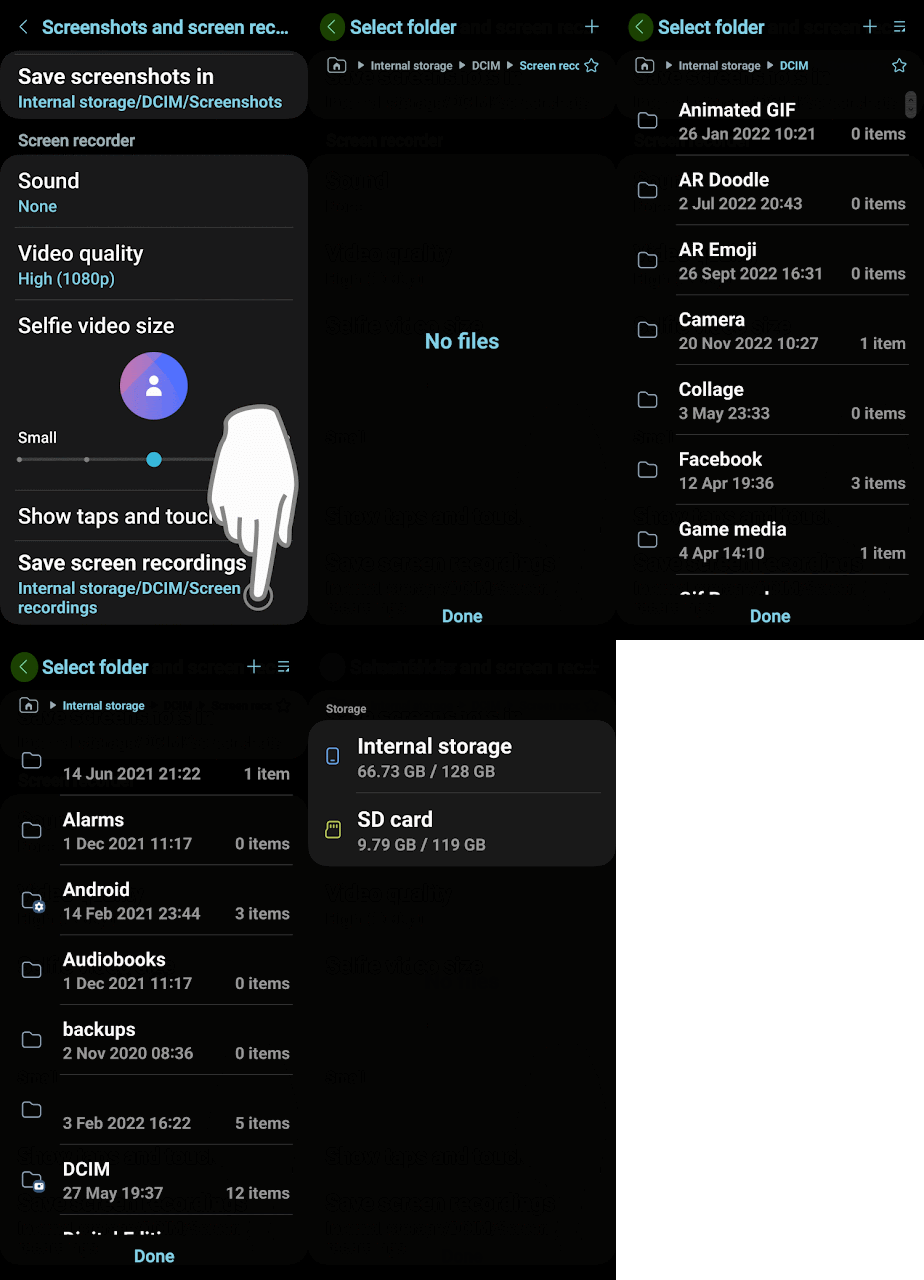
- To view where your screenshots are saved on your Samsung phone or tablet, tap on "Save Screen Recordings in" under the appropriate header.
- Tap "Back <" until you see options for Internal Storage and SD Card on the "Select Folder" screen. You can pick the Internal Storage directory once again, but you can also select SD Card.
- On the current page, select the folder you want to save the Screen Recording in and ultimately tap on "Done" to save settings.
As a result, every screen recording you take will be saved in the folder you just chose. Although they will be kept in a different folder on the internal storage or SD card, they may still be viewed through the Gallery.
Conclusion
Samsung provides six customization options for the screenshots and five customization options for the screen recordings. They can be enabled or disabled according to your needs with ease from the places that are mentioned at some part of relevant lines under a specific title.
The fact that Samsung routinely makes hardware and software updates should serve as a reminder that some of these features can be obsolete or you may see more options. It is advisable to consult the user manual or official documentation created for that device to receive the most accurate and updated information on the screenshot and screen recording settings of your Samsung smartphone and tablet. You may leave a comment below or get in touch with us through the Contact Us page if you have any more queries concerning the settings for screenshots and screen recording on Samsung smartphones or tablets. We would be delighted to assist you.





Comments
Post a Comment