With the Samsung Voice Recorder app, it is easy to record high-quality audio on Samsung smartphones with the utmost simplicity. It combines intuitive functionality with cutting-edge capabilities. This potent tool smoothly integrates into your everyday life, whether you're a student, writer, musician, or professional looking for a dependable means to save significant talks, lectures, interviews, or creative inspirations. Additionally, it makes things easier with the built-in feature that turns the voice into text simultaneously.
This is the only guide you need to learn every single thing. We will examine all the parts of the recorder from standard ways of recording to all settings for playing and editing.
- Recording Options: Standard and Speech-to-Text
- How Accurate the Results in Speech-to-Text?
- All the Settings of the Samsung Voice Recorder
- FAQs
- Is Samsung Voice Recorder Records Calls?
- How to Share Recorded Files on Samsung Voice Recorder?
- Where Are Voice Recordings Saved on Samsung?
- How Long Is It Possible to Voice Record on Samsung
- Is It Possible to Turn Standard Recording to Speech-to-Text?
- Conclusion
Recording Options: Standard and Speech-to-Text
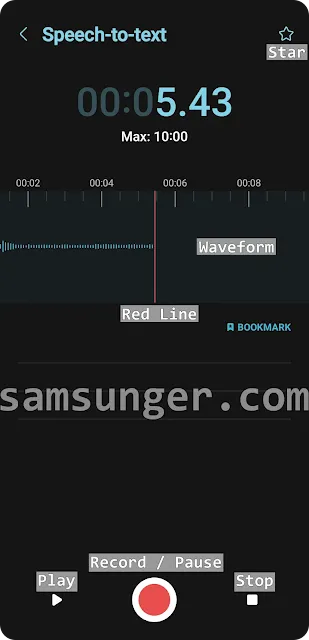
There are two types of recording options in Samsung Voice Recorder which are standard (works as much as other third-party apps that record the speaker or Bluetooth's mic with some useful features) and speech-to-text (as its name suggests, its records the voice and simultaneously turns the speech into a text that can be seen right below the recording area at the same time).
The speech-to-Text feature allows the users to record up to 10 minutes of speech recording into the text. The optimal result is upon you and the best practice is to hold the Samsung device (phone, tablet, etc.,) about 8 cm or 3 inches away from your mouth and speak as much clearly as you can.
Before starting the speech-to-text recording, choose the language from the "Language" button that is placed at the top left of the text box. 15 different languages are available like Deutsch, English, Espanol, Italiano, Portugues, and Français, unfortunately, other languages are not available.
When you are ready, tap on the "Recording" button. After that, you will probably see a notification screen on the screen that tells about the privacy policy of the feature. We strongly recommend you read the privacy policy and take the necessary action after that (agree or disagree).
We do not have the right to change the privacy policy according to our needs, that is why, the ones who disagree with the policy, may find other third-party applications, but again it is helpful to read the privacy policy and terms and conditions of the third-party though. Other ones can continue to read the rest of the post.
1 | While Recording
Once the "Recording" button (it has an icon of a red small circle within a bigger white one) is pressed, the device will listen to the voice and record every single second for the standard option and turn the speech into text on the screen simultaneously for the speech-to-text one.
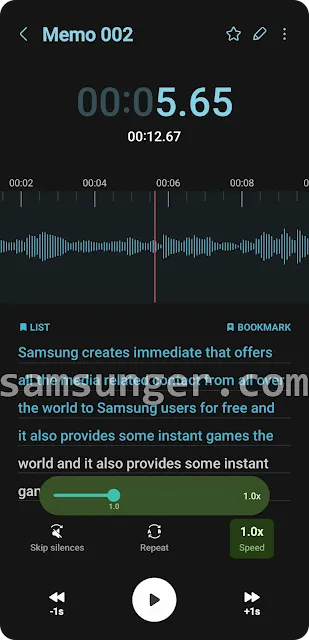
When it is necessary tap on the "Pause" button to pause the recording and at that stage you can listen to the voice recording from the beginning or from a particular second or minute with the help of the sliding waveform and "Play" button next to the recording button.
Keep in mind that, the red line is the place the recording will start when you tap on the recording button again after listening to the recording because of the fact that take the red line to the end of the recording and then tap the "Recording" button to continue. Otherwise, your voice and the text will start to be recorded from the sec or min the red line is left which will be resulted in recording over recording and mistakes in the text.
"Bookmark" is used to remind the important sec or min in the recording and allow the Samsung users to return to the same sec or min with ease when it is needed. Provided that there is a text on the bookmarked sec, the color of the text will turn into gold. Bookmarks can only be cleared only after the recording ends:
- Go to List.
- Open the speech-to-text recording you want to remove the bookmarks within.
- Tap List again which is placed at the top left of the text area.
- To delete, tap ⊝ button.
- To add a note, tap "Add Note" > type the note and ultimately tap Add.
The "Star" symbol is used to add the recording to the favorites. Recordings can be added to the favorite both during and after the recording by following the steps below:
- Go to List.
- Choose the recording you want to add the favorites and either tap on it until you see the pop-up menu at the bottom of the screen or tap three-vertical-dots ︙ > tap Edit and select the recording.
- On the floating menu, tap More.
- Finally, tap "Add to Favorites".
When all is set, tap on the "Stop" button to completely end the recording. On the next screen, type a file name and choose the category - you may either choose the predetermined categories or alternatively, you may add a new category by tapping the relevant place. In the end, do not forget to tap "Save".
In order to see the saved recording, tap "List" next to the three-vertical-dots ︙ on the home screen of Voice Recorder.
You can limit the results by tapping "All" and changing it to the category you want to see only on the screen.
2 | Playing Recording
When recording comes to an end, the play option shines on the horizon. It is time to play it. From now on, we will examine every single button and feature within the playing grounds.
Skip Silences
It skips the parts that have no sound or voice and directly moves to the second where it notices audio. When the silence part is short, the system decides whether to skip it or not according to the duration of the silence which is why it works better with large silent parts. Remember, as the name shows, it is just for skipping the silence parts while playing the recording, it does not trim the silence parts.
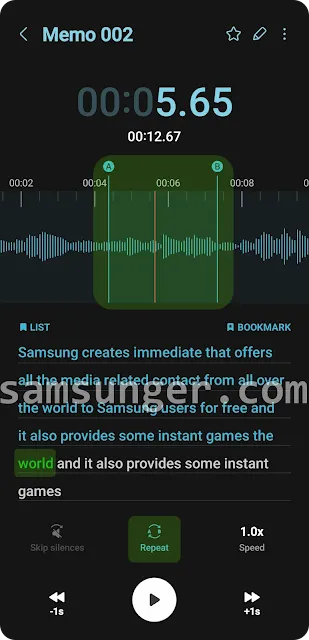
Repeat
It is another feature that is only related to the review part not editing. Plus, "Skip Silences" should be disabled in order for "Repeat" to be enabled. It basically allows the users to create an A point and B point and repeat the same recording between these points in an infinite loop.
Here is how to use it:
- Drag the red line to the second that you want to put the A point and tap Repeat.
- After that, drag the same line to add point B and tap Repeat again.
- Once the Play button is pressed, it will play the recording only between point A and point B and the playing will continue forever until you stop it or your Samsung device's battery is dead. The text within these points will turn from blue color to green color.
- Plus, the points are not pinned and can be adjustable. It only requires touching one of the points and dragging it backward or forward.
- Whenever your fancy takes, tap Repeat again to end the infinite loop.
Speed
As you can guess, it allows you to change the playing speed of the recording. It is set to 1.0x as the system default but can be between 0.5x and 2.0x. Note that "Skip Silences" is automatically locked when the speed is either below or above 1.0x.
Navigation Buttons
They make things easy to jump either forward or backward while playing the recording. Note that the jump seconds (-1s/+1s, -2s/+2s) vary based on the duration of the recording, so the jump seconds are not stable and increase with every increase in the duration.

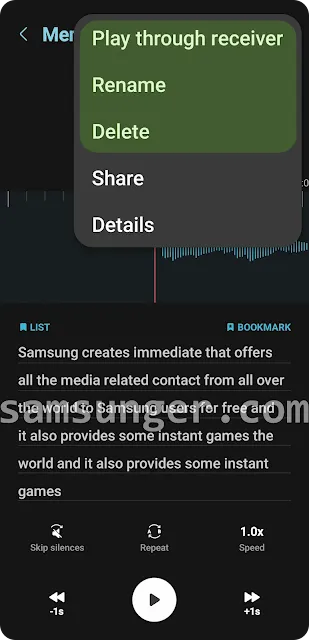
Play Through Speaker / Receiver
When it is set as play through speaker, the recording starts to be played through the speaker and it is useful in the environments where you are free to make noise. On the other hand, when it is played through the receiver, the recording sound comes directly from the receiver and it might be used to control it during traveling on public transportation and etc.
Rename
Once the name of the recording is saved, it does not stay there forever and can be renamed whenever you wish. When they are saved without changing the given name, the standard recordings are saved as Voice and get additional three numbers starting from 001 and increasing with each new one, and speech-to-text recordings are saved as Memo as the system default and the number principle is valid for this one as well. In order to rename, follow the steps below:
- Open Voice Recorder.
- Tap List.
- Open the recording you want to change the name.
- Tap three-vertical-dots ︙and select Rename
- Enter the new name and tap "Rename".
Delete
It is as easy as pie to delete the saved recording from the device:
- Open Voice Recorder and tap List.
- Open the file to be deleted.
- Tap three-vertical-dots ︙ and choose Delete.
- As long as Recycle Bin is enabled from the settings on your Samsung device, the deleted content will go to there and be saved for 30 days. Otherwise, it will be deleted completely.
- For that reason, on the confirmation screen either tap "Move to Recycle Bin" or "Delete" according to the settings you set before.
3 | Edit Recording
After the recording, it is obligatory to do the necessary changes over it to create the final phase to be used in videos or any other related documents. The editing options might not satisfy all kinds of Samsung users, especially the ones who looking for advanced features, we are sure it will meet the basic users' expectations. Without further ado, let's dive right into how to edit.
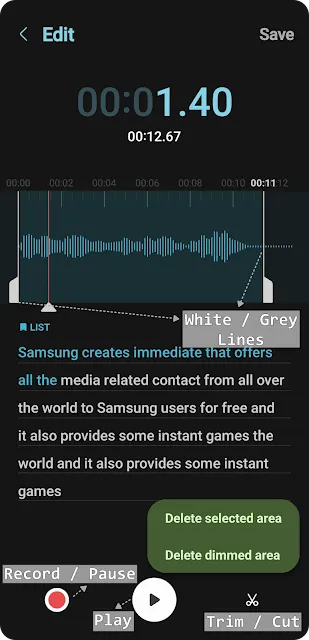
To edit the recording, tap the "Pencil" symbol from above.
Within the editing, there are three different features which are listed below.
Record Button
It has a symbol of a small red circle over a wider white one and allows recording additional voice or sound to the recording. There is a catch here, the recording starts from the second where the red line is located on the waveform, and in case there is already voice or sound within the relevant interval, it will be recorded over it. Because of the fact that red line should be dragged to the end of the recording and the recording should be started only in this scenario provided that the voice will not be recorded over a silent part.
When you are satisfied with the current situation, tap the "Pause" button again to stop the recording. In this case, the pause button stops the recording rather than the "Stop" button.
Cutting (Trimming) Button
This feature is only activated when there is a change in the edge lines of the waveform either from the beginning or the end. Otherwise, since there is no chance in the duration of the recording, it is not possible to trim. Here is how to trim the recording:
- Firstly, shorten the recording by dragging the white or grey lines on the waveform.
- Once the trimming tool is enabled, tap it.
- Choose from the two options.
- Delete Selected Area: trims the area that is between the two white or grey lines, and
- Delete Dimmed Area: trims the area that is outside the selected area or between the two white or grey lines.
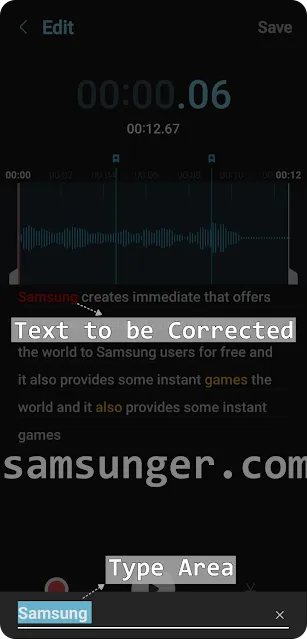
Correct Text
As we reviewed the accuracy of the feature under the title of "How Accurate the Results in Speech-to-Text?", sometimes the software cannot correctly detect the voice and shows wrong words and even takes the words that are said later to the beginning of the text. However, Samsung allows the user to edit the text one by one.
In order to do that:
- Just tap on the word that is wrongly detected.
- Type the correct one and finally tap "Done".
- After all of the editing process, do not forget to tap "Save" to keep the settings and apply it to the recording.
How Accurate the Results in Speech-to-Text?
On the paper, it is stated that the best result can be achieved when the mic is 8 cm or 3 inches far away from your mouth and it requires you to speak slowly and clearly. In practice, the results are divergent; some are close to the original text and some are not. We put 29 words of text into practice and it was read five times to compare the results.
Even though the recorder is completely useful to understand particular words and turning them into text, this is not the case for all the other words, the integrity and the accuracy of the overall text. An example of this can be seen in the picture below.
Accordingly, the best things that can be done to minimize the errors are complying with the practices of best results (8 cm / 3 inches away from the mouth, using a Bluetooth mic, speaking slowly and clearly) and double-checking the text again to change the errors.
*We would also like to point out that the result may vary based on the speech of the individuals.

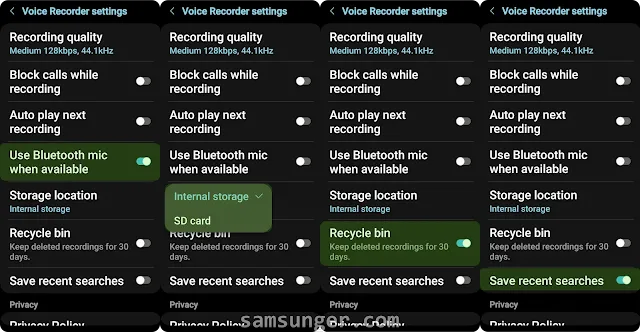
All the Settings of the Samsung Voice Recorder
Recording Quality
It basically refers to the fidelity and accuracy of the voice recorder. It offers three different quality options which are Low (64 kbps, 44.1kHz), Medium (128kbps, 44.1kHz), and High (256 kbps, 48kHz). Each increase in the quality comes with the increase in the storage it takes on the Internal Storage or SD Card.
Block Calls while Recording
It prevents any incoming calls from interrupting the voice recording. It ensures the integrity of the recording by blocking any possible sound that can be heard within the recording and frees Samsung users from finding the interruption seconds in recording and editing them one by one.
Auto Play Next Recording
Each time a recording comes to an end while you are listening, it automatically jumps to the next recording rather than requiring actions (like pressing the "Next" button) to play the next recording. It might be useful in hands-free operations like in such a case that your Samsung device is in your pocket and it is not possible to start playing the next voice recording with the touch controls of the Bluetooth device.

Use Bluetooth Mic when Available
Samsung Voice Recorder generally records the voice with the help of the built-in speaker which is placed at the bottom of the Samsung devices, but this feature prioritizes the Bluetooth mic when it is connected to the device to record the voice. Basically, it is not a requirement for the Bluetooth device but an option that gives top billing to the Bluetooth mic, and the speaker's microphone takes the stage again when a Bluetooth device is not available.
Storage Location
As long as you have external or expendable storage options on your Samsung phone or tablet, it is accomplishable to change the storage locations of the voice recordings from Internal Storage to SD Card, or vice versa.
Recycle Bin
It keeps the partially deleted recordings in the Recycle Bin for 30 days and they are completely deleted after this time. Keeping Recycle Bin enabled is advantageous because it does not let the deleted voice recordings vanish immediately but stores them until a particular period of time in case they might be deleted by mistake or may be required in the time to come.
Here is how to find Recycle Bin:
- Open Voice Recorder.
- Tap three-vertical-dots ︙from above.
- Select "Recycle Bin". Each deleted file can be seen here.
Save Recent Searches
It is only related to the search box in Voice Recorder. Each time you search for a recording within the app by using the search box, this option saves the recent searches under the "Recent Searches" heading in the search menu. Since it will save the searches, it is possible to clear the recent searches from the relevant place as well by tapping "Clear All".
Privacy Policy, Permissions, About Voice Recorder & Contact Us
Unlike other settings that make the app more user-friendly, all four remaining settings are only for giving information to the user. Under Privacy Policy, you may examine how it collects and manage your data; under Permissions, it is possible to see the required permissions for the app to be activated like Microphone and Music and Audio, and other optional permissions like Nearby Devices and Notifications; under Aboute Voice Recorder, app info can be seen by tapping the ⓘ symbol and Open Source Licenses can be viewed; lastly, under Contact Us, every single user can ask the question to the Samsung experts or Samsung lovers about the recorder and report any bug they are faced with.

FAQs
1 | Is Samsung Voice Recorder Records Calls?
Its only two functions are recording the voice with the help of a speaker or Bluetooth mic and converting the recording into text if it is required. It cannot record the calls on any Samsung phone. Recording the calls can be only and only realized provided that this kind of practice is legal in the country you are living in and both parties in the call have consent to be recorded, otherwise, it is not legal to do so.
2 | How to Share Recorded Files on Samsung Voice Recorder?
As there are multiple options to record the voice, there is more than one option to share it in different file types. However, it depends on the type of recording which is to say you may only share the voice when it is recorded with the Standard option, but voice file, text file, and text can be separately shared as well as the combination of voice and text files when it is recorded with Speech-to-Text option.
Here is how to share the recording:
- Open Voice Recorder.
- Tap List.
- Select the voice recording you want to share either by tapping and holding on to the recording until the time you see the menu that will appear at the bottom of the screen or by tapping the three-vertical-dots ︙ on the List menu > Share > Select the voice recording.
- Tap Share.
- Select the file type: Voice File, Text File, Text, Voice, and Text Files (the options depend on how the recording is saved).
- Select the app or person to be sent.
- Finally, tap Send.
3 | Where Are Voice Recordings Saved on Samsung?
Recordings are saved both within the Voice Recorder and My Files folders.
In Voice Recorder, they can be reached within the List folder:
- Open Voice Recorder.
- Tap List which is at the top right of the current page.
- Ta-da! All can be seen here.
Within My Files, they can be anywhere according to the location you set in Settings. In case you did not change anything in Setting and there is no external storage in your Samsung device, they can be reached from Recent Files and Internal Storage which is also the system default:
- Open My Files.
- Search for the upper section to see whether your recording is within Recent Files or not. If you cannot find it, follow the remaining steps below.
- Tap Internal Storage.
- Select Recordings.
- This time, select Voice Recorder. Here you can see all the saved recordings on your device.
In case you have external storage and you changed the settings for the storage location of your voice recordings, follow these steps instead:
- Open My Files.
- Tap SD Card.
- Find and tap Recordings.
- Select Voice Recorder. Here you can only see the recordings that you saved after changing the storage location from Internal Storage to SD Card.
4 | How Long Is It Possible to Voice Record on Samsung
The only limit for Standard voice recording is the storage on your Samsung device, however, this is not the case for Speech-to-Text recording because it is restricted to 10 minutes for each.
5 | Is It Possible to Turn Standard Recording to Speech-to-Text?
Yes, indeed. It is another good feature of the app that allows the user to switch between file types.
Here is how to do it:
- Go to Voice Recorder.
- Open "List".
- Choose the standard recording that will be turned into speech-to-text.
- Tap three-vertical-dots ︙.
- Select "Convert Speech to Text".
- On the next screen, select the language by tapping on the language button below the waveform. The language over the button is the same as the device's language, that's why it might vary.
- Ultimately, tap "Convert" and wait until the end of the recording or end it with the help of the "Stop" button in case only some parts are needed.
Conclusion
Samsung Voice Recorder not only provides the basic recording feature but also keeps up with the current tools related to documentation and offers speech-to-text. Even though it does not work as intended, it is possible to minimize the mistakes by adhering to the best practices and correcting the mistakes manually. Apart from that, the settings are quite enough for the basic users and we are sure they will satisfy the advanced users as well.
We are available to help you if you need any advice or assistance with the Samsung Voice Recorder on your Samsung Galaxy smartphone or tablet. Our devoted team is always accessible to help and give appropriate answers based on our experience. In cases when we might not have instant solutions, we might point you in the direction of educational articles written by community members that can help you analyze and resolve the problem you are experiencing. Please feel free to express any worries in the comments area, and we will do everything we can to assist you.
Comments
Post a Comment