Are you tired of controlling multiple email accounts? Samsung Email is here to make your life easier.
Let's take a closer look at Samsung Email, the app that helps you handle all your emails in one spot. Whether you want to write, read, or organize emails, and even customize your email signature or block annoying spam calls, we'll show you how Samsung Email simplifies your email world.
IN THIS POST
- What Is Samsung Email App?
- Download and Setup the Samsung Email App
- Download the Samsung Email App
- Add a Personal or Business Account to the Samsung Email App
- Grant Access to Samsung Email
- Use the Samsung Email App
- Block Spam Emails
- Compose and Send Emails
- Stay Informed with the Samsung Email App
- FAQs
- Conclusion
What Is Samsung Email App?
Samsung Email is an email app published by Samsung Electronics that allows Android users to control their all personal and business email accounts like Gmail or Yahoo from a single place.
It requires a one-time access to the email account to read, compose, send and permanently delete all your emails, however, it does not realise these actions by itself, only takes permission from the email service to let you make changes and sync it with the server of the email client.
Download and Setup the Samsung Email App
Download the Samsung Email App
Samsung Email app might be preloaded on your Samsung phone or tablet, if not, it should be downloaded either from the Galaxy Store or Google Play Store.
- Open either Google Play Store or Galaxy Store.
- Type "Samsung Email" in the search box.
- Download the Samsung Email app published by Samsung Electronics Co., Ltd.

Add a Personal or Business Account to the Samsung Email App
After successfully installing the app from the app market to your mobile device, it is time to launch the app and add personal or business email accounts to control all from one place.
Email addresses can be set up in the Samsung email app either automatically or manually.
Automatic Email Setup
This method only requires the email address and password to complete the authentication. It is compatible with Gmail, Yahoo and Microsoft email clients.
Here is how to set up an email account automatically:
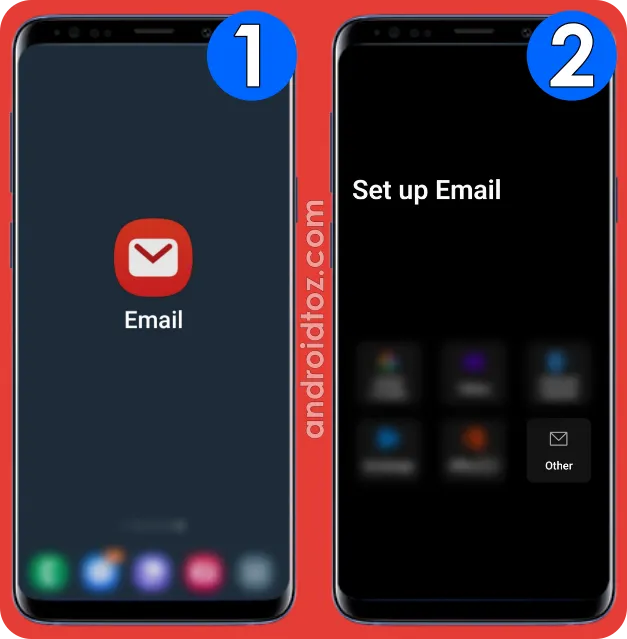
- Open the Samsung Email app.
- Select an email client (Gmail, Yahoo, Hotmail, Outlook...).
- Enter the email address and password.
- If prompted, tap "Allow" access to Samsung Email to read, compose, send and permanently delete all your email from Gmail.
- Note that Samsung Email will not delete your Gmail account itself, but it will let you the ability to manage your emails within the app.
- Read the "Privacy Policy" and "Terms of Service" of Samsung Email and make sure that you trust Samsung Email.
- The rest will be done by email client and the account will be added to the Samsung Email app.


Manual Email Setup
All other email accounts apart from Gmail, Yahoo, and Microsoft should be manually adjusted to be linked.
Here is how to set up an email account manually:
- Open the Samsung Email app.
- Select "Other".
- Enter the "Email Address".
- After that, tap "Manual Setup".
- Select the account type (POP3, IMAP or Microsoft Exchange ActiveSync).
- POP3: Select this if you are using your emails on a single device. It is like paper letters. Once you delete a received email, they are taken from the inbox and no longer stored in the inbox but the changes made on a particular device will not be reflected on other devices. In other words, each device has its own local storage, so an email that is deleted on any device will not be reflected on other devices.
- IMAP: Select this if you are using your emails on multiple devices. It is like a book. Once you open a received email, it still continues to be stored in the inbox. In other words, if you check your email on any other device, it will be in the inbox.
- Wait for the "Checking auto setup information..." to be completed.
- Control the IMAP or POP3 server, security type and port settings.
- Enter the password.
- Ultimately, tap "Sign In" to add it to the Samsung Email.


Grant Access to Samsung Email
In case your Gmail account is added to the Samsung Email of your own accord or not, Gmail sends a notification to warn you about the reality with the title "Samsung Email was granted access to your Google Account". It is just for security because Google cannot be near you when you add the email address, so cannot be aware of whether the action is done by you or not.
If you are the one who granted the access, you should not worry about it because it is a legitimate notification to keep you informed about your Gmail account and show what features the Samsung Email app has access to. Samsung Email has generally access to read, compose, send and permanently delete all your emails from Gmail.
If you are not the one who granted the access, you should check the activity and secure your account by revoking the access and changing the password of your Gmail account.
Revoke Access to Samsung Email
Here is how to revoke the access to Samsung Email:
- Go to apps with access to your Google account.
- If prompted, sign into your Google Account that you want to revoke access to the Samsung Email app.
- Tap or click "Samsung Email".
- Find "Delete all connections you have with Samsung Email" and tap or click on it.
- Read the information and tap or click "Confirm".
Note that the data you shared with the Samsung Email will not be deleted. For this open "Samsung Email" and delete the data directly from the app.
Also, do not forget to change the password as well.


Use the Samsung Email App
Like the other email clients, Samsung Email consists of various folders including Inbox and Outbox.
The default view of emails in the folders is "Standard" but it is not restricted with this. There is an additional view option named "Conversation".
"Conversation" view groups all the emails from the same person into a tidy single chat like the private messages in a messaging app which is only between you and your friends, while the "Standard" view does not group emails and classifies any new email as a new chat which makes it untidy and hard to follow.
Change the Email View
Can't stand to the disarrangement? No argument there, it is generally hard to find what we are looking for within thousands of received emails.
Luckily, it is possible to choose the view of how the emails are grouped in the inbox, though there are not many options apart from "Conversation" and "Standard".
Here is how to change the view:
- Open the Samsung Email app.
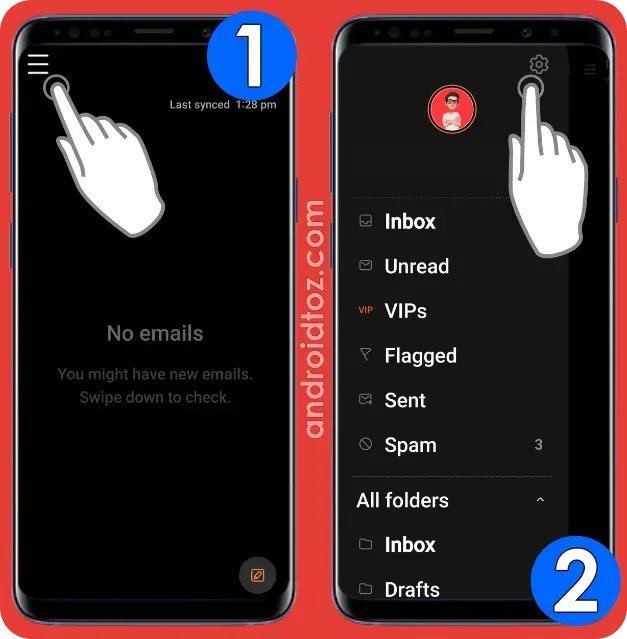
- Tap three-vertical-lines ☰.
- Tap "Settings".
- Find "View" and tap on it.
- Select the view type (standard or conversation).


Ensure Sync Is Not Turned Off
Email sync is essential for the Samsung Email app to check new messages in your inbox, update the conversation and make the necessary changes. Long story short, it ensures the emails in your inbox are up-to-date and they can be accessible from another device as well.
Since sync ensures that you receive new emails as long as they arrive in your inbox, it should be enabled from Settings in the app. In normal conditions, it is turned on, however, you or the system might have turned it off somehow. Not to worry, it is not a big problem.
Here is how to solve the sync is turned off problem:
- Open the Samsung Email App.
- Tap three-vertical-lines ☰.
- Tap "Settings".
- Tap on the email account you want to enable sync for.
- Tap the switch next to "Sync Emails" to solve the problem.

Additionally, it is better to check "Sync Settings" from the same page like Email Sync Schedule, Limit Retrieval Size While Roaming and so forth.
For the sake of example, you may set the sync schedule from "Email Sync Schedule" which basically allows the user to select the sync methods which are Auto, Manually and After a Particular Period of Time or you may limit the retrieval size for roaming from "Limit Retrieval Size While Roaming" which lets you decide how many visual content you want to see in the email when you are not connected to Wi-Fi or Mobile Hotspot.
View and Save Email Attachments in a Secure Way
Pure text is not always enough to complete the task in email communication and requires additional resources like images, documents and so on. However, we do not only receive emails from our loved ones or friends, there are also other ones we have not heard of before. For that reason, security comes into being when viewing pictures or other related file formats in the received emails.
Unfortunately, Samsung Email does not demonstrate a preview of the shared file with the recipient as Gmail or Outlook app. Instead, it shows a picture icon with a reddish colour. To be more exact, it requires specific settings to be activated to ensure security and show the images after the initial view.
You may say what is "after the initial view" supposed to mean. In short course, there is no way to escape from the picture icon until it is viewed once. Only after the first view, the picture is always shown in emails based on whether the required settings are enabled.
Show Images
- Open the Samsung Email app.
- Tap three-vertical-lines ☰.
- Tap "Settings".
- Select the email account you want to set the settings.
- Find "Show Images".
- Tap the switch next to "Show Images" to turn it on.
- Right below "Show Images", there is another one which is "Auto Download Attachments".
- Check whether it is turned off or not. If not, tap the switch next to it to turn it off.


As aforementioned, even though you have enabled "Show Images" and disabled "Auto Download Attachments", the picture will not directly be shown in the email by the time the email is opened for the first time instead a pink or reddish picture icon will appear.
In order to view the image safely, tap right on the picture icon instead of "Save" which will load and show the image in the viewer and will not be downloaded to the Samsung or Android device.
After the initial view, the picture icon will be replaced with the preview of the picture. Nevertheless, the preview size might be unsatisfactory which certainly needs a redesign by Samsung Mobile.
Once you are sure it is a safe file, just tap "Save" to save the image both to the Gallery and Internal Storage (Download folder).

Block Spam Emails
Unfortunately, some software apps that we have shared our email addresses with are hacked or not that reliable which results in spam email bombardment to our accounts. Fortunately, email services have certain mechanisms to block or mark email addresses as spam to filter out harmful emails and prevent them from reaching us. It might be classified as a little effort but corresponds to the backbone of digital safety.
Here is how to block or add an email address to the spam:
- Open Samsung Email.
- Go to "Inbox".
- Tap and hold the received email until you see the toolbar at the bottom of the screen.
- Tap "More ⁝".
- Tap "Mark as Spam".


In this way, the email addresses and emails received from that address will be moved to the "Spam" folder and any further email from that address will be only stored in the "Spam" folder and will not be shown in "Inbox".
Remove the Blocked Address from the Spam Filter
In order to reverse a misunderstanding, or in other words remove the block address from the spam filter:
- Open Samsung Email.
- Tap three-vertical-lines ☰.
- Select the "Spam" folder.
- Tap and hold the blocked email until you see the toolbar at the bottom of the screen.
- Tap "More ⁝".
- Tap "Remove from Spam".


Compose and Send Emails
Alright, we have thoroughly covered how we could view the received emails. However, it would be super absurd provided that we can only view emails and cannot send ours.
Samsung Email app, as long as access is granted, allows the user to compose and send emails using the saved Gmail, Yahoo, Microsoft or other email account. As not different from other email apps, it is possible to attach files from the device to the written email.
Note that once you have sent the email, it cannot be edited or recalled.
Here is how to compose an email:
- Open the Samsung Email app.
- Tap the "Compose" icon which looks like a pen within the rounded square.
- If more than one option is prompted, select "Compose New Email".
- Type the email address you want to send the email into the "To" input field or select an existing "Contact".
- Type the title of your email's content into the "Subject".
- Type the content into the "message box" and use the formatting toolbar at the bottom of the page to customize the appearance of the text in the email.
- Slide the formatting toolbar to the left to see additional formatting options.
- Tap the "Paperclip" icon in the top right of the page to attach a file from Gallery, Samsung Music, Voice Recorder or My Files.
- Select the app you want to attach a file from.
- Select the file(s).
- Tap "Done".
- In the end, tap the "Paper Plane" icon in the top right of the page to send it.


Change Email Signature
Noticed a "Sent from my Galaxy" text in the message box of every email you compose? It is a "signature".
A signature in the email app is like a digital business card consisting of name, contact information, title and related things that are automatically attached to the end of each email you send. Plus, it relieves you of adding the same basic information again and again.
The default signature in the Samsung Email app is "Sent from my Galaxy", however, it can be changed or disabled as well.
Here is how to change or disable the signature:
- Open the Samsung Email app.
- Tap three-vertical-lines ☰.
- Tap "Settings".
- Select the account you want to change the signature of.
- Find "Signature".
- To turn it off, tap the switch next to it.
- Tap right on the signature to open the editor.
- Type or draw the new signature.
- Tap "Save" to save the settings.


Stay Informed with the Samsung Email App
Allow Samsung Email App Notifications
Rely on your mobile device to keep you informed when you receive a new incoming email in the Samsung Email application but it is failing to deliver them? It will be right, it only needs further instruction. How do we know that? Because we have experienced the same problem as well.
- Open Settings.
- Tap "Notifications".
- Select "App Notifications".
- Find or search for "Samsung Email" and tap on it to expand the settings.
- At this stage, enable "Allow Notifications".
- Tap "Notification Categories" from the very bottom of the current page.
- Select the notification category you want to get notifications about like "New Emails", "Other Notifications" etc.
- Tap right on the notification category to see all the settings.
- Tap the switch next to "Show As Pop-Up" to enable the notification both as a pop-up and in the notification panel.


Change Samsung Email Notification Sound
The default notification sound is applied to all system or third-party apps on Samsung mobile devices without any exceptions which makes us lost in the noise of the same sound. However, you may need a customization to distinguish the notification of the Samsung Email app from the others. Given the fact that it is a good idea to make some changes to make it more distinguishable and assist you in understanding which apps send notifications without even lifting the phone or tablet.
Here is how to change the notification sound for Samsung Email:
- Open Settings.
- Select "Notifications".
- Tap "App Notifications".
- Find "Samsung Email" and tap on it to see all the specific settings in detail.
- Tap "Notification Categories" from the bottom of the screen.
- Select the notification categories such as "New Emails" and tap on it to expand the settings.
- Tap "Sound".
- Ultimately, select the new custom or system sound for the Samsung Email app.


FAQs
Is Samsung Email Safe?
Samsung Email is produced by Samsung Mobile which makes it pretty safe and secure to use. Plus, it provides S/MIME encryption and spam protection to secure email communication, get software updates frequently and so on.
However, it is better to read the Privacy Policy and Terms and Conditions of Samsung Email whose provisions might not be the right choice for you.
How to Delete Samsung Email?
- Find the Samsung Email app on the home or apps screen.
- Tap and hold on the app until you see the floating toolbar.
- Tap "Uninstall".
- Since we have installed it from the Galaxy Store, it is available. If it is not on your Samsung device, the only remaining option is "Disable" which removes the app from the apps screen, stops it from running in the background and prevents further updates.
- Tap "OK" to confirm the action.
How to Remove an Account from Samsung Email?
- Open the Samsung Email app.
- Tap three-vertical-lines ☰.
- Tap "Settings".
- Select the account you want to remove.
- Tap "Remove".
- Read the information and tap "Remove" again to confirm the action.
Conclusion
Samsung Email is certainly a useful app that lets Samsung members control all their email accounts from a single app. Other than that it provides everything that other email apps can. However, it has its own shortcomings which might be fixed in the coming versions like there is no way to see the attachment preview before an initial load even if the "Show Images" feature is enabled and the "Auto Download Attachments" feature is disabled. Fortunately, it is possible to view the attachment in the viewer safely before downloading it.
If you have any further questions regarding Samsung Email, kindly leave a comment in the space below. If we can understand the topic of your query, we might be able to provide you some of the answers. Do not worry; in other cases, we can provide you access to particular postings made by members of the community that you can read and use to evaluate the problem you're attempting to understand.
how to put notification sound in spam emails
ReplyDeleteUnfortunately, putting custom notification sound to spam emails is not available on Samsung Email app, but it is possible to set a custom notification sound for all new emails received from Samsung Email app. Here is how to do:
Delete1. Open 'Settings'.
2. Select 'Notifications'.
3. Tap 'App Notifications'.
4. Tap on 'Samsung Email'.
5. Tap 'Notification Categories'.
6. Tap on a notification category (New emails, snoozed emails, new emails from VIPs, and so forth).
7. Tap 'Sound'.
8. Select a new sound.