Have you ever been in a situation where you accidentally dismissed a crucial notification on your Android device, leaving you desperately wishing for a way to see it one more time? Samsung has actually developed a range of convenient solutions to help you display those crucial notifications with ease.
Come with us as we explore Samsung notification history, providing you with the means you need to never miss out on important notifications again.

IN THIS POST
- Samsung Notification History
- Samsung Notification History using NotiStar
- Download NotiStar using the Galaxy Store
- Activate Notification History
- Display Notification History
- Keyword Search: Find Previous Notifications with Ease
- Select Notification Storage Period
- Application List: Select Apps to Keep Notification History
- User Filter List: Choose Apps and Keywords to Limit Notification History
- Access NotiStar on the Lock Screen
- Samsung Notification History using Samsung Flow
- Install Samsung Flow on Both Samsung and Windows
- Pair Devices on Samsung Flow
- Select and Send App Notifications to Windows PC to Save Notification History While Connected
- Conclusion
Samsung Notification History
Samsung has a convenient 'notification history' feature that lets the users access recently dismissed app alerts and eliminates the need to find and install a secure third-party app to check the notification log.
It is divided into two sections called 'Recently Dismissed' and 'Last 24 Hours'. While, 'Recently Dismissed' displays the 5 to 10 most recently dismissed notifications on the Android device, 'Last 24 Hours' demonstrates a comprehensive list of alerts received within the past day.
However, there is a caveat to keep in mind - it only begins collecting data only after it has been enabled. Provided that it has not been activated beforehand, it does not display any historical notification data. Otherwise, it would be a massive breach of users' privacy.
See Notification History
Once enabled, Samsung's notification history offers valuable insights into the device activity. However, it is essential to be aware that it may not always directly navigate you to the source of each notification. What do we mean by this?
For instance, if you receive a WhatsApp message, it has no problem in displaying the message content and the sender's information. However, tapping on it doesn't usually open the specific private or group chat within WhatsApp. Instead, it may direct you to the app's homepage or notification settings, where you can customize notification sounds which is not quite related to notification log.
Here is how to enable notification history and record forthcoming notifications:
- Open 'Settings'.
- Select 'Notifications'.
- Tap 'Advanced Settings'.
- Tap 'Notification History'.
- Tap the switch to turn on the notification history and start to a notification record.


Samsung Notification History using NotiStar
Notification History serves its purpose, but it pales in comparison to the more advanced NotiStar module of the Samsung Good Lock app.
Good Lock is an official app of Samsung that empowers Samsung members to take their mobile device customization to the next level, offering features beyond what Android and OneUI typically provide such as customizing the built-in S Pen functionalities and changing the typing sound of the Samsung keyboard.
When it comes to NotiStar, it is the module of Good Lock especially created to log the notifications of Samsung users and provide advanced options in comparison with the built-in notification history.
However, it is worth noting that NotiStar is exclusive to the Galaxy Store and not available in all countries, though its availability continues to expand day by day.
Download NotiStar using the Galaxy Store
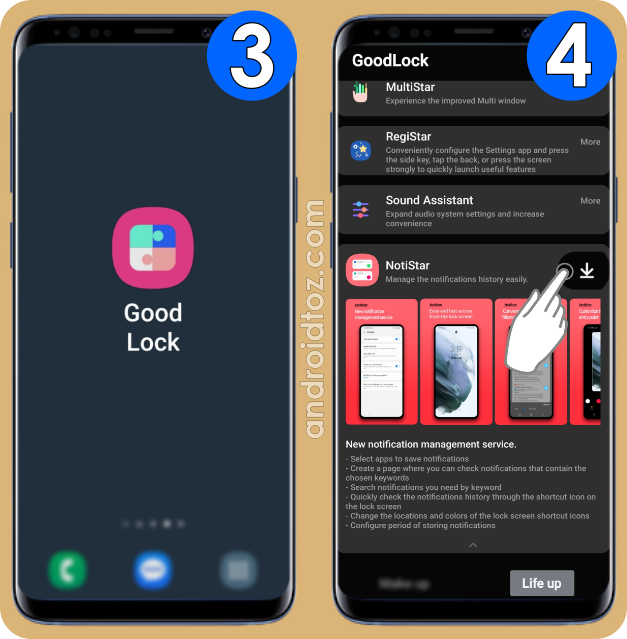
Here is how to install NotiStar using the Galaxy Store:
- Open Galaxy Store.
- Tap 'Search Box' and type 'Good Lock'.
- Download the app published by 'Good Lock Labs'.
- Open the Good Lock app.
- Tap the 'Life Up' menu.
- Download 'NotiStar'.


Activate Notification History
Neither the built-in notification history nor the NotiStar stores the data without the explicit consent of the user.
As NotiStar does not come preloaded on Samsung phones or tablets, 'notification history' should be activated to let the app access the information and store it until the end of the notification storage period.
Here is how to activate the notification center on NotiStar:
- Open the Good Lock app.
- Select the 'Life Up' menu.
- Tap 'NotiStar'.
- Tap the switch next to 'Activate NotiStar'.


Display Notification History
Once it is turned on, NotiStar begins to collect and categorize all the notifications you receive. The complete list of previous app alerts can be accessible by either opening the NotiStar app or by a simple swipe up on the NotiStar icon on the lock screen.

The notification list showcases a comprehensive archive of all the received notifications, complete with the app name, the time it has been sent, the sender's information, and the app alert's content.
By the time a notification is tapped, it might not open the exact location within the app, as it might have been deleted from the Android device. Instead, it may open the homepage of the app that sent the notification and the notifications remain safely stored as long as they are not manually cleared or the storage period does not exceed.

Individual notifications can be removed by tapping and swiping left or right.

To clear all notifications at once, simply tap 'Clear All' and confirm the action by selecting 'Yes'.

Holding down on individual notifications reveals extra choices: 'Copy' and 'Share.' Using this gesture, it is possible to copy the specific notification to the clipboard or share it through Quick Share, Private Share, or other compatible apps.

Keyword Search: Find Previous Notifications with Ease
NotiStar introduces a handy 'keyword search' feature. Given the extensive notification storage capabilities range from 7 days to no limit, it makes sense to provide users with an efficient means to find specific notifications.
In other words, it functions like a search bar, enabling users to locate far gone notifications with ease by simply typing the relevant keywords.
Here is how to use keyword search on NotiStar:
- Open the Good Lock app and select the 'Life Up' menu.
- Tap 'NotiStar'.
- Tap the search box that writes 'keyword search' in it at the top.
- Type the keyword you would like to find a specific notification about such as Samsung Free or Accidental Touch Protection.


Select Notification Storage Period
One of the most noticeable distinctions between the default Android notification history and NotiStar is the duration for which they store notifications.
The default one is a bit forgetful; it only holds onto app alerts for a short 24-hour period. In sharp contrast, NotiStar lets the users retain notifications without any restrictions that begin with 7 days to forever.
Here is how to select the notification storage period on NotiStar:
- Open the Good Lock app and select the 'Life Up' menu.
- Tap 'NotiStar'.
- Tap three vertical dots︙ in the top right.
- Tap 'Settings'.
- Tap 'Notification Storage Period'.
- Select the storage period (7/30 days, 6 months, 1 year or no limit).


Application List: Select Apps to Keep Notification History
The default notification log on Samsung devices follows a standardized approach, consolidating all past notifications in one place without offering users the ability to designate which previous app notifications they want to keep.
NotiStar, on the other hand, provides users with the option to select either all notifications or specific app notifications for storage.
Here is how to select apps to keep notification history on NotiStar:
- Open the Good Lock app and select 'NotiStar'.
- Tap three-vertical-dots︙.
- Tap 'Settings'.
- Tap 'Application List'.
- Select the applications to receive and record notifications.


User Filter List: Choose Apps and Keywords to Limit Notification History
Unlike the default notification history that groups notifications from all apps together, NotiStar goes a step ahead.
It organizes these notifications neatly in an 'All' section and provides the option to establish distinct categories for specific apps or keywords.
For instance, the 'Samsung AR Doodle' category to keep notifications only from that app or the 'Samsung Gallery' category and 'collage' and 'GIF' keywords to store notifications include 'collage and GIF' sent by 'Samsung Gallery'.
Here is how to choose apps and keywords to filter notification history on NotiStar:
- Open the Good Lock app and select 'NotiStar'.
- Tap three-vertical-dots︙.
- Select 'Settings'.
- Tap 'User Filter List'.
- Tap 'Add Filter'.
- Enter the file name.
- E.g. 'Smart View' for a filter to archive notifications sent by the Smart View app.
- Tap 'Add Keyword'.
- It is not obligatory. Keywords may be added to only store notifications containing the specified keyword(s).
- E.g. 'Mail', 'Job', 'Today' and so forth.
- Tap 'Application List'.
- Select the app(s) to be stored in that filter.
- E.g. If the file name is 'Samsung AR Doodle', select only the 'Samsung AR Doodle' app.
- Tap 'Save'.
- Go back.
- Open notification history of NotiStar.
- Tap the filter name next to the 'All' category at the bottom to only display filtered apps or keywords such as 'Samsung Email' for the app and 'meeting' for the keyword.


Access NotiStar on the Lock Screen
Convenience is on NotiStar's side as well. When enabled, it creates a lock screen icon that enables direct access to the Samsung notification history, saving users the hassle of navigating through the settings or app.
Here is how to create ︽ (double circumflex accent) icon to open NotiStar on Lock Screen:
- Open the Good Lock app and select 'NotiStar'.
- Tap three-vertical-dots︙.
- Select 'Settings'.
- Tap the switch next to 'Using on Lock Screen' to enable it unless it is not enabled as the system default.
- Additionally, enable 'Sync with Screen Lock' to access notification history only after unlocking while a secure lock type is set.
- Otherwise, anybody with your phone can see all the notification logs with a single swipe up.
- Ultimately, tap 'Start Icon Settings' to change the colour, position and transparency of the ︽ (double circumflex accent) icon.


After that, lock your Android device by pressing the Side Key (Power Button), and press the Side Key (Power Button) again to wake the screen. More specifically, it is the button to turn off the Samsung phone or tablet.
Tap the ︽ (double circumflex accent) icon, swipe upwards, and use biometrics or a PIN to unlock the device, allowing direct access to the notification log from the lock screen.

Samsung Notification History using Samsung Flow
Are you acquainted with the Samsung Flow app? This application seamlessly connects your mobile devices to a Windows (10 or 11) PC, enabling smooth file exchange between the two. It also serves as a basic alternative to track notification history.
One standout feature it offers is 'Selected App Notifications' which allows specific apps to send notifications to the paired device and enables you to view and respond to these notifications directly from your Windows computer.
Furthermore, the Windows computer maintains a duplicate record of received notifications, retaining them until the moment the computer and Samsung device are disconnected. This feature ensures that important notifications are not missed, even if accidentally dismissed on your phone or tablet.
Install Samsung Flow on Both Samsung and Windows
Samsung Flow is not included as a default system app on either Windows computers or Samsung phones. Therefore, the initial step is to download the app if it has not been previously installed on your device.
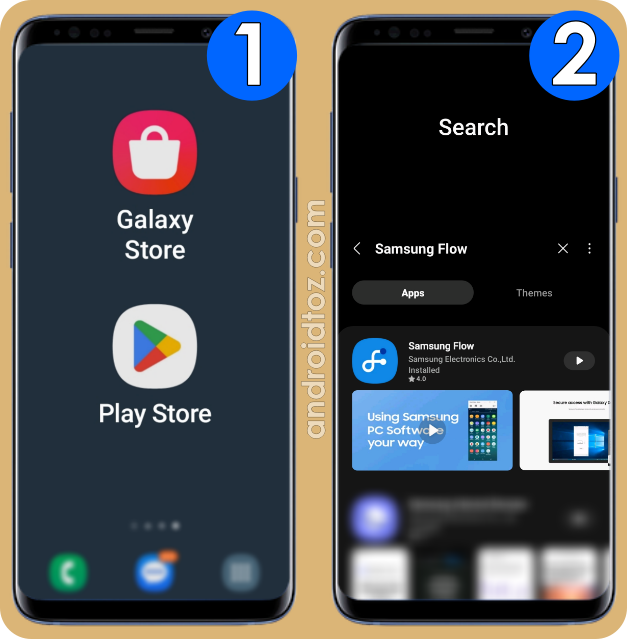
Here is how to download the Samsung Flow app on both Samsung and Windows:
- Samsung:
- Open Google Play Store or Galaxy Store.
- Tap 'Search Box' and search for 'Samsung Flow'.
- Check the publisher information that should be 'Samsung Electronics Co., Ltd.'
- Tap 'Install'.
- Note that Samsung Flow is only compatible with Samsung phones and tablets with Android 7.0 N (Nougat) OS or a more recent version. As of May 16, 2022, it no longer offers support for Android 6.0 M (Marshmallow), but Android 6.0 M users can continue to use it without needing to update.
- Windows:
- Open 'Microsoft Store'.
- Tap 'Search Box' and search for 'Samsung Flow'.
- Control the publisher data which should be 'Samsung Electronics Co., Ltd.'
- Click 'Download'.
- Note that Samsung Flow is only compatible with Windows computers with Windows 10 or 11 OS (Operating System) Creators update (V1703) or any more recent version.

Pair Devices on Samsung Flow
Once Samsung Flow has been downloaded on both devices, the next step is to establish a connection within the app, enabling the transfer of all or selected app notifications from the mobile device to the computer.
Here is how to pair devices in Samsung Flow:
- Open Samsung Flow on both your Windows and Samsung devices.
- After thoroughly reviewing the Samsung Flow Terms & Conditions, click or tap 'Continue' to accept and proceed to setup.
- Grant all permissions to the app.
- Select 'Bluetooth or Wi-Fi/LAN' connection:
- Turn on Wi-Fi and Bluetooth on both devices.
- On your Samsung device, specify whether to connect it to a tablet or a computer.
- Look at the Samsung Flow app on your Windows computer.
- Click on your Samsung device to connect.
- Select the method (Bluetooth or Wi-Fi) to pair devices.
- Control whether the 6-digit passcodes are the same, if so tap 'OK' on both devices.


Select and Send App Notifications to Windows PC to Save Notification History While Connected
After configuring, choose the apps on your Samsung mobile device that will deliver notifications to the paired device.
Initially, it is a good idea to select all the apps. However, if, for instance, one of the apps bombards your connected device with notifications every 3 minutes, such as music apps, it is advisable to exclude that specific app from the list.
Here is how to select apps to send notifications to the connected device:
- Open the Samsung Flow app on the Samsung device.
- Make sure Samsung and Windows device is connected.
- Open Samsung Flow on both devices.
- Select the Samsung device to connect to the Windows computer.
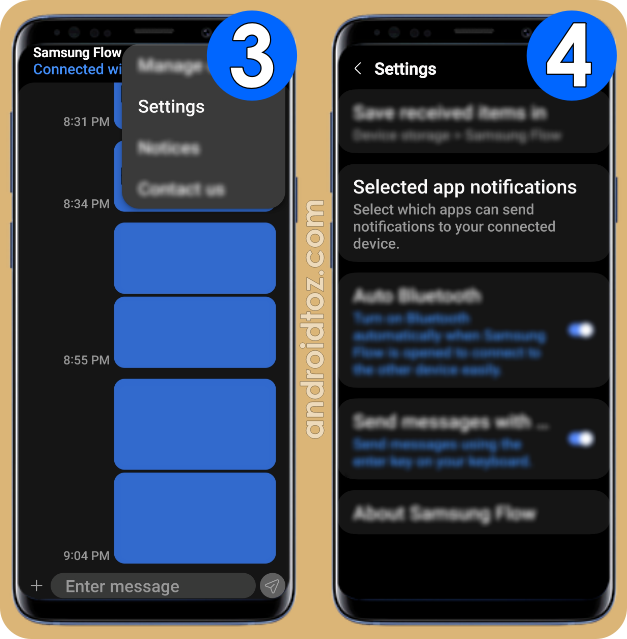
- Tap three-vertical-dots︙ in the top right.
- Select 'Settings'.
- Tap 'Selected App Notifications'.
- Select which apps can send notifications to your connected device:
- To select all, tap the toggle beside 'All Apps'.
- To select specific apps, tap the toggle twice next to 'All Apps' to deselect all apps and then tap the toggle next to the app you want to select.


Subsequent to that, chosen notifications will be forwarded from Samsung to the 'Notifications' menu on Windows. These notifications persist on the connected device even if they are dismissed on the Samsung Galaxy smartphone until the devices are disconnected.
While this functionality may seem basic and relies on a stable connection between the devices, it effectively serves the purpose of maintaining a notification history. It also provides alternative means to access dismissed notifications and automatically remove them when the devices are eventually disconnected.
Here is how to track all sent notifications on a Windows computer:
- Open the Samsung Flow app on a Windows computer.
- Select the Samsung device to connect.
- Make sure the Samsung Flow app is opened on the Samsung device while attempting to connect to the device.
- Tap 'Ring Bell' (Notifications) to see all the received notifications.


Conclusion
Samsung Galaxy Notification History ecosystem offers a range of options for users seeking to manage their notification history, each with its own unique set of features and limitations. The default notification history feature, while only displaying dismissed notifications and storing data for up to 1 day, provides a basic level of functionality. In contrast, Samsung Flow offers a more rudimentary approach, restricting access to notification history exclusively when a Samsung device is connected to a Windows computer and lacking mobile device access. NotiStar, on the other hand, emerges as the most advanced solution, granting users the flexibility to select specific apps for notification storage, customize storage periods from 7 days to an unlimited duration, and manage notifications with ease.
Comments
Post a Comment